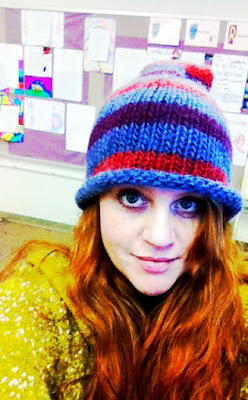
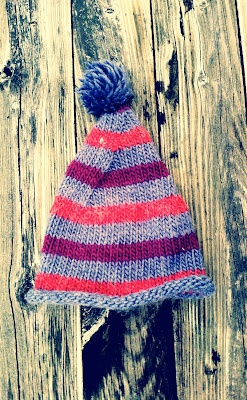
Years ago I had a BF that really wanted a stocking cap to sleep in. Yes, sleep in. Isn't that odd? I couldn't find a pattern that I liked on the Internetz. They were all so long and I didn't want to get strangled while I was sleeping, so I went about experimenting. I came up with an easy and fast pattern that used up odds and ends of bulky yarn and made a fun hat. See picture for fun factor.
After so long I'm writing this hat up for several reasons. One is that people always ask about it when I wear it. ".Where did I get that hat? ... Oh, you made it?" Then "Is there a pattern?" Now I can direct them here. Another is that this is my tried and true winter hat. It's the hat I leave at school and wear during recess outside in Ithaca that keeps my ears from falling off (last winter that was nearly every day). Another fantastic reason to share this pattern is that this hat fits on my head no matter what I do to my hair AND covers my ears. Bun? Stretch - NO problem. Pony tail? Slips right over and bounces back into place. Hair down? Hat heaven. It also never comes off. The cold wind blowing over the hills around Ithaca has nothing on this stocking hat. It's warm, it's snuggly and stays on your head regardless of hairstyle or weather.
What You Need:
To get rid of the jog when changing colors, simply slip the first stitch as if to purl and knit as indicated in the pattern directions for the rest of the round. This makes an even color join when knitting in the round. Easy, and works like a charm.
Stripy Stocking Hat
Cast on 51 stitches with size 13 needle in the main color (MC). Divide stitches evenly over needles - 17 per needle (If using a circular needle place a marker at the join). Knit 5 rounds. If you're looking for a tighter fit you may want to switch to size 11 needles after the caston to knit this first section of MC (this is my preference when knitting with Baby Grande Alpaca).
Switch to contrasting color 1 (CC1) and knit for 4 rounds.
Switch to MC and knit for 5 rounds.
Switch to contrasting color 2 (CC2) and knit 4 rounds.
Switch to MC and knit 5 rounds.
Switch to CC1 and knit 2 rounds. [If using a circular needle set up with markers on this last row: K17 place marker (PM), K17 PM, K17 and you come to the end of the round with a marker already there. If not, place one now. ]
After so long I'm writing this hat up for several reasons. One is that people always ask about it when I wear it. ".Where did I get that hat? ... Oh, you made it?" Then "Is there a pattern?" Now I can direct them here. Another is that this is my tried and true winter hat. It's the hat I leave at school and wear during recess outside in Ithaca that keeps my ears from falling off (last winter that was nearly every day). Another fantastic reason to share this pattern is that this hat fits on my head no matter what I do to my hair AND covers my ears. Bun? Stretch - NO problem. Pony tail? Slips right over and bounces back into place. Hair down? Hat heaven. It also never comes off. The cold wind blowing over the hills around Ithaca has nothing on this stocking hat. It's warm, it's snuggly and stays on your head regardless of hairstyle or weather.
What You Need:
- Odds and ends of bulky weight yarn totaling 95 grams (including pompom) in a combination that pleases you. I used 3 colors of left-over Lamb's Pride Bulky. The yarn that I had the most of (light purple) became the main color.
- 1 set of US13 DPNs (or hat sized circular). Possibly size 11s as well. Brittanys are easy to find and a joy to knit with.
- Stitch markers if you wish to use them. I'll put directions for these in parentheses.
- Tapestry needle for weaving in ends
- Gauge is 2.5 stitch and 4 rows make 1 inch in stockinette in the round.
To get rid of the jog when changing colors, simply slip the first stitch as if to purl and knit as indicated in the pattern directions for the rest of the round. This makes an even color join when knitting in the round. Easy, and works like a charm.
Stripy Stocking Hat
Cast on 51 stitches with size 13 needle in the main color (MC). Divide stitches evenly over needles - 17 per needle (If using a circular needle place a marker at the join). Knit 5 rounds. If you're looking for a tighter fit you may want to switch to size 11 needles after the caston to knit this first section of MC (this is my preference when knitting with Baby Grande Alpaca).
Switch to contrasting color 1 (CC1) and knit for 4 rounds.
Switch to MC and knit for 5 rounds.
Switch to contrasting color 2 (CC2) and knit 4 rounds.
Switch to MC and knit 5 rounds.
Switch to CC1 and knit 2 rounds. [If using a circular needle set up with markers on this last row: K17 place marker (PM), K17 PM, K17 and you come to the end of the round with a marker already there. If not, place one now. ]
Begin Gradual Decrease of Hat Circumference
DPNs: All decreasing rounds follow this pattern: Knit until last 3 stitches on needle, K2Tog, Knit 1.
Circular: All decreasing rounds follow this pattern: Knit until last 3 stitches before marker, K2Tog, Knit 1. Why do it this way? Knitting one stitch after the decrease on the third K2Tog makes for a nice join when you slip the first stitch in a color change.
Still in CC1
Round (R) 1: decrease (48 stitches)
R2: knit all stitches.
Change to MC
R3: decrease (45 stitches)
R4: knit all stitches.
R5: decrease (42 stitches)
R6: knit all stitches.
R7: decrease (39 stitches)
Change to CC2
R8: knit all stitches.
R9: decrease ( 36 stitches)
R10: knit all stitches.
R11: decrease (33 stitches)
Change to MC
R12: knit all stitches.
R13: decrease (30 stitches)
R14:knit all stitches.
R15: decrease (27 stitches)
R16: knit all stitches.
Change to CC1
R17: decrease (24 stitches)
R18: knit all stitches.
R19: decrease (21 stitches)
R20: knit all stitches.
Change to MC
R21: decrease (18 stitches)
R22: knit all stitches.
R23: decrease (15 stitches)
R24: knit all stitches.
R25: decrease (12 stitches)
Change to CC2
R26: knit all stitches.
R27: decrease (9 stitches)
Still in CC2 Put down the 4th DPN. Take the third needle (the one you just finished knitting) and K2Tog on 1st needle. Divide the remaining 8 stitches evenly onto needles 1 and 3 from needle 2. (if using circular needle K2Tog and separate the remaining 8 stitches evenly onto two needle points for Kitchener stitch.)
Kitchener the remaining 8 stitches together. (I'm a Kitchener fiend and so I like to do it at every available opportunity. It just looks so nice. You should try it, too, especially if you haven't before. This is the PERFECT opportunity to practice: the pompom will cover up any imperfections that might crop up into your work.
Kitchener tutorial on Knitty.com: http://www.knitty.com/ISSUEsummer04/FEATtheresasum04.html
Kitchener tutorial on Knit Picks http://www.knitpicks.com/tutorials/Kitchener_Stitch__D41.html
Pull yarn through last loop and weave in ends.
Make one foofy pompom to sew onto end.


Comments